This article describes how to set up a fully chrooted Cherokee server with a Django web site. This is certainly not an obvious task and I think others may find it useful, so here’s how to do it.
Setting up the chroot environment
Before continuing you propably should know what a chroot is. In short, it is a folder that contains a Unix hierarchy, just like the root of the file system. It will allow us to run processes inside that folder, isolated from the rest of the system.
We can jail the Cherokee web server this way; this would make attackers unable to access outside resources.
So first you will need to create your chroot directory. I have choosen /srv to do it, but you can choose something else if you prefer, I’ll just refer to it for the rest of the tutorial.
I install my chroot in ArchLinux using my favorite package manager: pacman.
If you use a different distribution, you can probably use your package manager, if it supports chroots; alternatively, it is good to know that you can still build a chroot made of ArchLinux packages and use it, but you would have to build pacman from source.
So let’s start. Here’s what we want to install, in order:
- the base system: filesystem, coreutils, grep, sed, awk, perl, findutils, file, bash, util-linux-ng, pam, shadow (maybe others)
- the django stuff: python, django, flup
Installing is done using this command:
# pacman -r /srv -Sy stuff
You may see errors when installing filesystem, but it’s safe to ignore them.
The next step is to mount /tmp into the chroot. This will make it shared between the chroot and the main system. This is because sometimes you need to access sockets through /tmp (/tmp/mysql.sock for example). So add the following line to /etc/fstab:
/tmp /srv/tmp none bind 0 0
And mount it:
# mount /srv/tmp
Your chrooted apps will need some more files to work properly.
- group, passwd, shadow: to make it aware of user accounts and groups
- resolv.conf: make it able to resolve host names
You can copy these files from your root environment but I prefer hard links:
# ln -f /etc/passwd /srv/etc/passwd
# ln -f /etc/group /srv/etc/group
# ln -f /etc/shadow /srv/etc/shadow
# ln -f /etc/resolv.conf /srv/etc/resolv.conf
Configuring cherokee
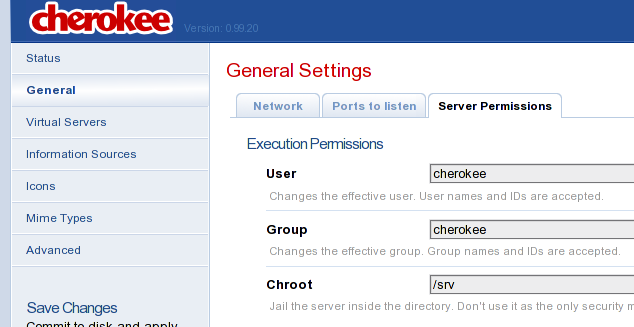
In Server Permissions, tell cherokee to use /srv as the chroot directory. Be sure to also define a user and group to drop permissions, because chrooting is pretty worthless without it (unless you use the grsecurity patchset).

That’s it. Make sure to always use paths relative to /srv in the cherokee config (i.e. /htdocs instead of /srv/htdocs).
Django stuff is a bit more difficult to get working right. For some reason, cherokee will not chroot your python scripts inside /srv, so you will need some extra magic to achieve this.
Schroot (secure chroot)
schroot is a command-line utility that lets you run scripts in a chroot with reduced privileges. Install it.
Edit /etc/schroot/schroot.conf and add a section to it. I call it /srv, the same as the directory.
[/srv]
description=/srv
type=directory
location=/srv
priority=1
users=django_user
groups=http,django_user
Put your allowed users and groups here (which will run the python scripts). Create them if necessary.
Next, assuming you have your django site in /srv/http/mysite, you should be able to run:
# su django_user
# schroot -c /srv -d /http/mysite -- ./manage.py runfcgi \
method=threaded host=localhost port=8001 protocol=scgi
Make sure you have made manage.py executable, it is not by default. After it starts successfully, kill the process.
# ps axu | grep fcgi
995      12956  [...] python ./manage.py runfcgi [...]
# kill 12956
Configuring your django virtual host
In your cherokee virtual host, set up your information like below:
The command-line you see is truncated, but it’s the same as above.
Now restart Cherokee and that should be it. Enjoy :)

